
Last updated on October 15, 2023 by Liza Hawkins
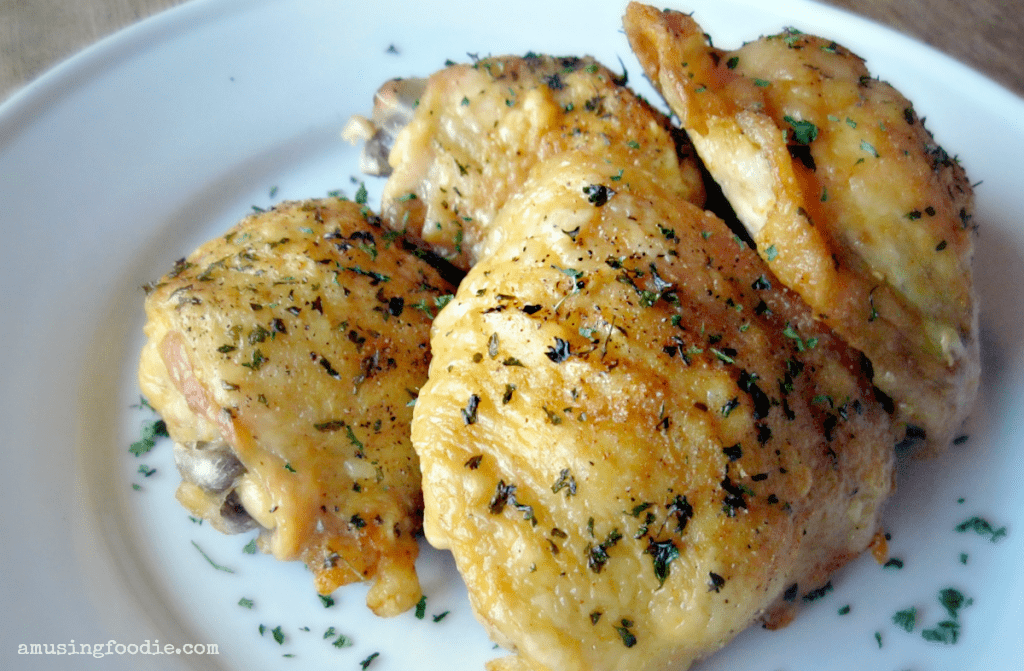
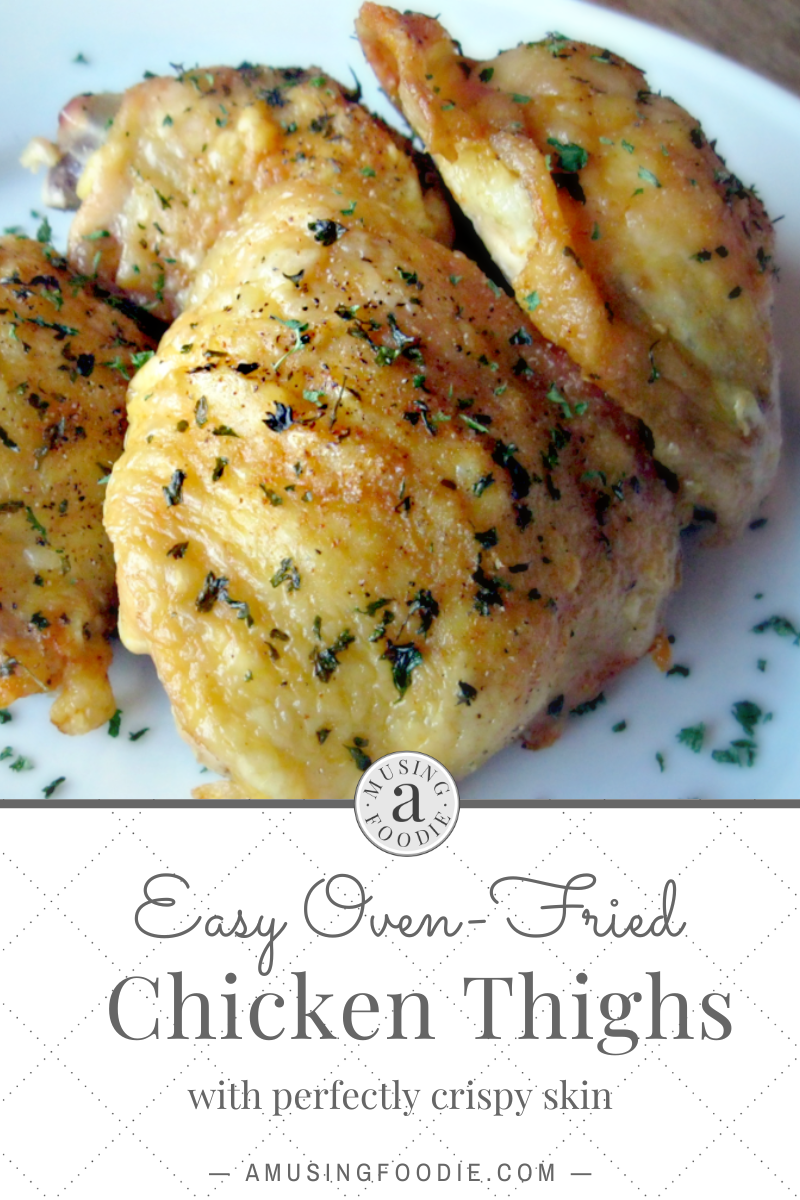
These bone-in easy oven fried chicken thighs will become a fast favorite in your house. The perfectly crispy skin melts in your mouth and is worth fighting over!
As an Amazon Associate I earn from qualifying purchases. This post may contain affiliate links.
When my kids were little, springtime got a little bit nuts schedule-wise.
Actually, it was a lot nuts.
Back then, my husband was a high school lacrosse coach and the season kicked off March 1. From March to June he was pretty much out of pocket — some days home around 7:30 p.m., and other nights he wouldn’t get home until 10:00 p.m. or later. Sometimes he’d be gone a few days at a stretch depending on tournament and club travel schedules.
Couple that with my eldest’s afterschool activity schedule, and it made cooking a family dinner challenging. And by “challenging” I mean nearly impossible.
Instead I tried to cook meals that the kids and I could eat together, but would also save well for a late night re-heat for my husband.
This chaos is how my oven fried chicken thighs recipe was born. And, even though things have settled down now that our kids are older, these oven fried chicken thighs are still a staple in my recipe rotation over a decade later.
Between simple prep, inexpensive and limited ingredients, and easy reheat-ability, it’s no wonder I’ve considered these crispy baked chicken thighs a go-to all these years!
Here are some favorite recipes I like to pair with oven fried chicken thighs:
- Homemade mashed potatoes
- Roasted brussels sprouts with bacon
- Old fashioned creamy potato salad
- Corn on the cob
- Gorgonzola, almond, cranberry, and field green salad
- Scalloped potatoes

Easy Oven-Fried Chicken Thighs with Perfectly Crispy Skin
These easy oven-fried chicken thighs with perfectly crispy skin are really easy to make and so good!
Ingredients
- 4 chicken thighs, bone-in and skin on
- 2 tablespoons olive oil
- 1 teaspoon garlic salt
- 1/4 teaspoon finely ground black pepper
- 1 tablespoon dried parsley
Instructions
- Preheat the oven to 425°F.
- Place the chicken thighs on a baking sheet and drizzle them generously with olive oil.
- Sprinkle each chicken thigh with garlic salt, pepper and parsley.
- Bake for 50 minutes, until the skin is golden and crispy.
- Remove from the oven and let rest for 5 minutes before serving.
Recommended Products
As an Amazon Associate and member of other affiliate programs, I earn from qualifying purchases.
Nutrition Information:
Yield:
4Serving Size:
1Amount Per Serving: Calories: 341Total Fat: 25gSaturated Fat: 6gTrans Fat: 0gUnsaturated Fat: 18gCholesterol: 166mgSodium: 624mgCarbohydrates: 1gFiber: 0gSugar: 0gProtein: 31g
You weren’t kidding about it being easy. The best part is that the end product looks like something out of a catering bristol menu. That’s very impressive kitchen magic.
Looks yummy. Will try it for dinner tonight and let you know how hubby likes it. 🙂
Terrific! Enjoy!
You have given excellent recipe of easy oven fried chicken thighs. The recipe is very good
Made this tonight for dinner! Your recipe saved me on this busy evening! Thank you!!! 🙂
@jhoff – yay! Glad you liked them! My family considers this a favorite, and I switch up the seasonings often – sometimes use a little chili powder or BBQ seasoning, maybe Old Bay. So easy!
First time I made thighs. Used this recipe and they were delish!! The while family loved them, thank you!!
I’m so glad you loved them!
Made this last night and wow! Yummy and oh so easy!!
Forgot to say this is going on my rotation of dinner recipes! Thanks for the recipe!
Yay! So glad! We love it too. 🙂
I have been looking for just such a recipe for a long time. Thank you very much!!!!!!!
You’re very welcome, Maggie!!
Reheats yes, stays crispy no. Very good ( and crispy ) right out of the oven. Pairs well with garlic mashed potatoes.
That’s true, David! Glad you enjoyed the crispness straight from the oven!
Reheat in toaster oven. Skin crisps back up nicely 🙂
BRILLIANT.
My husband loves this chicken. The recipe was so easy thank you
Shana – I’m so glad! It’s still a favorite in our house too. Mmm….
You had me at ‘super crispy skin’ thanks for sharing
Sarah – you won’t be disappointed!
I will have to pick up some thighs at Costco this week! Thanks!
Joelyn – hope you like them!
Heck, we leave on the skin most of the time… looks delicious! Thanks for sharing.
Gonna pin and use it next week, I found a pack of legs on quick sale last week and my hubby has been begging for fried chicken!
I always buy the thighs, but I bet legs would work well too! You’ll have to come back and report! 🙂
This does look easy and yum!!! Thanks for sharing.
Great easy recipe. Thanks! I also get the funky schedule messing with family meal time. We juggle here and plan for it accordingly every week.
Kia – as the kids get older, I only see it getting crazier! Goal is to eat most dinners as a family, with the reality that it’s not always possible (and that’s okay too).
Oh, gosh, you get it! It can be close to impossible to juggle my husband’s work & military schedules with Superkiddo’s homework & extracurricular activities. I typically eat with the kiddo, get him bathed, and put to bed. Then I steal bites from the hubby’s salad plate when he gets home. 🙂 I cherish weekends when we can all finally eat together.
I think that my family will love this recipe; I am adding it to our list for next week.
Let me know what you think! My daughter doesn’t like the skin, so she takes it off – which leaves more crispiness for the rest of us! 🙂
Wow! That looks so delicious and sounds so simple. Definitely a keeper recipe. Thanks!
It’s SO simple. The hardest part is waiting 50 minutes for it to be done! 😉
Making this tonight, my husband is the same as yours with the schedules! This will be just perfect. Thank you xo(:
Stacy – hope you love it as much as we do! It’s become a staple in our house. 🙂
Needed a recipe for chicken thighs but wanted a baked with a crispy yet not “fried” crust. I saw your recipe and read the reviews. Looks awesome and will give it a try for tonight’s dinner. Will definitely let you know my thoughts. Looking forward to it. Thinking of serving it with red beans and rice and a salad. Thanks for the recipe!
Hope you love it!
Great recipe! Tried it tonight and the skin came out perfectly! Thanks!
Maria – glad to hear it! I love how easy it is! 😀
Thank you for this recipe. Finally I got chicken with crispy skin! This recipe is so easy and so good. I used fresh garlic and rubbed some under the skin to keep the skin dry. I had no parsley so I used some dry basil and it came out very well. Everyone loved the chicken.
Thank you!! My youngest is a BIG fan of that crispy skin. It’s one of his favorite things!
Love this recipe! It’s my favorite!
It’s one of ours, too. We have it a few times a month!
Wow, this is a winner! So easy and my husband loves it! 😀 Thanks for sharing!
Thanks!
These were perfect, thanks! I used duck fat instead of olive oil, and broiled for a minute when they were done. Lovely!
Oooooh – duck fat. How fancy! Yum!
I’m going to make this recipe for oven-friend chicken legs and thighs tonight, Liza. It only has 5 ingredients…that’s MY kind of recipe! I love looking at your recipes. You’re a creative cook!
Thanks, Jan! What’d your family think?
I can’t wait to try this recipe! The only thing is that I have a big family. Can I easily just triple the recipe? What kind of pan? And would it be the same time and temp in oven?
Hi! Yes, this recipe is sooooo easy to double or triple. The only watch-out is about crowding the thighs. If they’re too smooshed together, then the skin won’t get nice and crispy all over — you want at least a 1/2″ between them. So, I’d use two sheet pans (with edges), and put one on each oven rack to bake. You might get a little smoke since the skin pops a bit as it’s cooking, and your sheets will be close to the top of the oven (and the bottom to the top sheet). Hopefully this makes sense!
great to know and great tips yay! The only thing is that I am a beginner cook and you totally lost me on your last line. Eek! I’m not quite sure what you mean so sorry! Also, So it will bake evenly even if I put both pans on the racks? Should I switch them mid way so the bottom one can go on top for some time and vice versa? I apologize for all the questions I’m just excited to try this as first time to bake chicken like this. Thank you!
No apologies! 🙂 You shouldn’t need to switch racks mid-baking, unless you notice the top (or bottom) pan of chicken is browning faster. In terms of the “smoke” comment, I was referring to a really hot oven. and how the chicken may spatter a bit while it’s cooking (mmm…crispy skin), and when you use both racks, or if you have one rack close to the top, then it can make things smokier. Doesn’t hurt anything, though.
we made these last night, they tasted just perfect. Thanks for sharing.
Simon
Great!
How would you adapt this to get a crispy skin BBQ chicken thigh?
I’ve tried adding BBQ sauce once the skin is crispy, and it doesn’t stay crispy. I think you either need to use a thin BBQ sauce and just sort of mop it on at the very, very end OR you need to use a BBQ dry rub to season it before it bakes.
Do you think BBQ sauce at the end of the cook time and changing to broiler would work?
It’s funny you say that — I just tried that broil method at the end last week, and while it got the BBQ sauce all nice and caramelized, the skin was still soggy afterwards. 🙁
ah…bummer. We’re doing a dinner for the local homeless shelter this Saturday and BBQ is the chicken of choice. Just hate to serve soggy skin 🙁
I feel ya – it doesn’t bother me so much when the skin is thinner, but I’m not sure how much you can control that! I suppose you could take the skins off first?
Thank you kindly for your ideas. I was thinking about what you said about a dry rub. Kind of reminds me of my Mom using Shake ‘n’Bake BBQ. If memory serves, it was a dry rub that got kind of “saucy” and caramelized when done. I guess I could try a homemade dry rub to achieve a similar effect…?
So, I’d do a dry rub using chili powder, paprika, mustard powder, salt, pepper, brown sugar (and/or any other yummy BBQ flavors), and then drizzle them with olive oil before baking as directed. I bet you’ll get a crispy and caramelized texture, even if it’s not saucy!
Olive oil on a patted dry skin first then seasoning? Or vice versa? This sounds like a great alternative!
Oooh – good call. Probably olive oil first (so that the skins are nicely and evenly coated) then the dry rub. You might want to drizzle a little more olive oil on top afterwards, depending on how thick your dry rub ends up being on each thigh.
Many thanks for all the advice. I will give it a whirl!
You’ll have to report back once you’re done!
You bet!
Well the story ends… I didn’t achieve a really crispy skin. What crisp I got was lost when BBQ sauce was applied. It wasn’t totally flabby skin but it wasn’t where I would have liked it to be. Someone suggested next time, that I try it at a high heat just to crisp the skin then turn it down to cook through and add a tiny bit of BBQ sauce at the end. I suppose I can try that.
I do appreciate all the help! It’s a work in progress 🙂
Ah, yes. The BBQ sauce/crispy skin dilemma. I, too, haven’t found a way to marry them both (as you know). I thought you were going to try the BBQ dry rub approach?
I didn’t actually have a dry rub because I didn’t have all the ingredients on hand to make one. I did have the wet BBQ sauce. I remember making them last year and the sauce caramelized so nicely but the base was not crispy. So anyway, delicious flavor, cooked through, moist and juicy! So thank you! I will continue to experiment!
Is it normal for it to be a bit smokey/steamy when cooking it in the oven?
Two reasons that can happen: (1) If you’re using a rack and the drippings start to smoke in the bottom of the pan — you can remedy that by putting some water in the bottom of the pan before you put the pan into bake. If you’re not using a rack, this probably isn’t the problem. (2) If the oven rack you’re using is too close to the top of the oven the splatter from the skin can hit the top and cause some smoke since the oven’s so hot. Just be sure to use the position in the middle/lower portion of the oven.
Hope that helps!
I like cooking chicken thighs with bone in and skin on in the oven. I drizzled a bit of olive oil over them and then flipped them over and smeared them around in the oil. After that, I sprinkled on a very small amount of chicken rub (that I got from a Paleo website) on both sides of the chicken. Then, I popped them into the oven on a roasting rack at 425 degrees. After 35 minutes, I turned them over and cooked for another 15 minutes. The skin was perfectly crispy and flavoured. The meat was moist inside. These thighs are great with a salad for next day or in a wrap.
I’ve never flipped mine mid-bake, but I’ll have to try that next time I make them! Glad you enjoyed!
What temperature for baking for 50minutes?
Hi Kevin! The oven is at 425°F for 50 minutes. You can start checking at 40-45 minutes if your thighs are on the small side, but I find in most cases they need the full 45-50 minutes.